

The Short Answer: Most central air conditioner installations take between four and eight hours when replacing an existing system. New construction or installations that require new ductwork, electrical upgrades, or significant additional work can take longer, sometimes stretching across two days.
Replacing an AC unit is a bigger project than most homeowners expect the first time. It is not just swapping one box for another. A proper professional AC installation covers everything from disconnecting the old unit safely to testing the new system under real load conditions before the crew leaves your home. Knowing what to expect from the installation process makes the whole experience less stressful and helps you ask the right questions before you sign anything.
How Long Does It Take to Install an AC Unit?
Installation time depends on several variables. Here is a realistic breakdown by scenario:
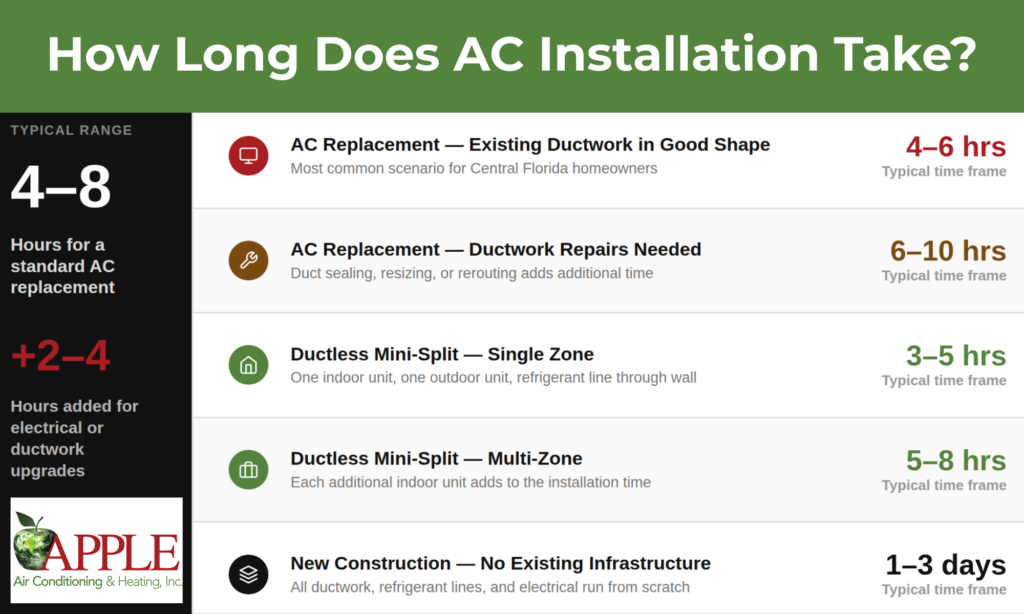
A straightforward AC replacement where the existing infrastructure is solid is typically a one-day job. An experienced, seasoned technician working on a standard residential swap can often have the new system running in half a day. Where jobs stretch into additional time, it is usually because of one of the factors below.
What Affects Installation Time
Size and Square Footage of the Home
Larger homes require larger systems, and larger systems take more time to set up, brace, connect, and test. A 5-ton unit going into a 3,000-square-foot home takes more time to commission than a 2-ton unit in a 1,000-square-foot condo. Your HVAC contractor should help you determine the correct size equipment for your home before installation day to ensure the system is properly matched to your comfort needs and efficiency goals.
Condition of Existing Infrastructure
This is the single biggest variable in installation time. If the existing ductwork is damaged, undersized, or improperly run, repairs or modifications add significant time. The same applies if the electrical panel needs an upgrade to handle the new system’s load. An HVAC professional doing a thorough pre-installation assessment will catch most of these issues before the installation date so there are no surprises on the day.
Type of System Being Installed
- Central air replacement: The most common scenario. Old unit comes out, new unit goes in. Existing refrigerant lines, ductwork, and electrical connections may be reused when they are in good condition. At Apple Air, we often recommend replacing existing refrigerant lines when they are in corrosive environments, such as under-slab chases where deterioration is more likely over time. We typically recommend reuse when the lines are “high and dry,” such as when they are located within interior walls and their integrity can be properly inspected and verified.
- Ductless mini-split system: Requires running a refrigerant line through the wall and mounting an indoor unit in each zone. No ductwork needed, but each zone adds installation time.
- New construction: No existing infrastructure means the HVAC professional is running everything from scratch, including all ductwork, refrigerant lines, and electrical connections.
Electrical Work
If the new AC system requires a dedicated circuit, a new disconnect box, or a panel upgrade, an electrician may need to be involved either before or during installation. This adds to the overall time frame, but it is not uncommon in older homes.
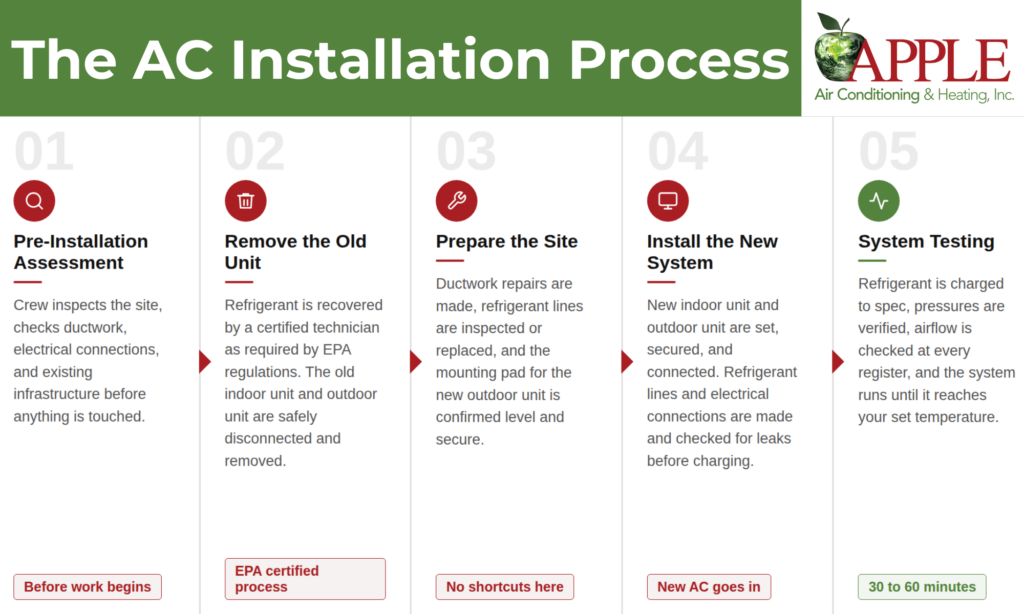
The AC Installation Process, Step by Step
Knowing what a qualified technician actually does during an installation helps you understand why it takes the time it does.
Step 1: Pre-Installation Assessment
Before anything is disconnected, the crew inspects the installation site, confirms measurements, checks the condition of existing ductwork and electrical connections, and identifies anything that needs to be addressed before the new system goes in.
Step 2: Removing the Old Unit
The old unit’s refrigerant is recovered by a certified technician before disconnection. This is required by EPA regulations and cannot be skipped. The indoor unit and outdoor unit are then disconnected and removed from the installation site.
Step 3: Preparing the Installation Site
Any necessary ductwork repairs happen at this stage. If the refrigerant lines are being reused, they are inspected and flushed. If new lines are needed, they are run now. The pad or mounting bracket for the new outdoor unit is confirmed level and secure.
Step 4: Installing the New System
The new indoor unit and outdoor unit are set in place, secured, and connected. Refrigerant lines are connected and the system is checked for a refrigerant leak before charging. Electrical connections are made and tested. If the installation involves a ductless mini-split, the wall penetration for the refrigerant line is made at this stage and the indoor unit is mounted on the wall bracket.
Step 5: System Testing
This is where a professional AC installation separates itself from a rushed job. A thorough HVAC technician will:
- Charge the system with the correct amount of refrigerant
- Verify refrigerant pressures on both the high and low sides
- Test all electrical connections and controls
- Confirm the thermostat is communicating correctly with the new system
- Run the system and verify it reaches the set temperature
- Check airflow at every supply register in the home
- Walk you through the new system’s operation and any new features
System testing alone can take 30 to 60 minutes. Skipping it is how refrigerant leaks and wiring problems get missed until the first hot day of summer.
What Makes a Good AC Installation
The difference between a good installation and a poor one often shows up months later in energy bills or system performance. A properly sized and installed AC system running at optimal performance will consistently cost less to operate than one that was rushed or incorrectly commissioned.
A few things that separate quality installations:
- The system is sized using actual load calculations, not guesswork based on the old unit’s size
- Ductwork is inspected and sealed, not just assumed to be fine
- Refrigerant is charged to manufacturer spec, not approximated
- Electrical connections are tested, not just visually inspected
- The homeowner is walked through routine maintenance requirements before the crew leaves
According to the U.S. Department of Energy, improper installation can reduce an air conditioning system’s energy efficiency by up to 30 percent. That translates directly to higher energy bills every month for the life of the system.
Why DIY Installation Is Not Worth the Risk
Homeowners sometimes look into DIY installation to save money, especially on a ductless mini-split, where the marketing materials can make it sound straightforward. The reality is that handling refrigerant legally requires EPA Section 608 certification. Incorrect refrigerant charging, improper electrical connections, and a poorly mounted indoor or outdoor unit can all lead to refrigerant leaks, premature compressor failure, or voided manufacturer warranties. A DIY project that saves a few hundred dollars upfront can easily cost thousands in repairs within the first year.
A professional installation with a 10-year parts and labor warranty is a far better investment than a DIY attempt that leaves you responsible for every repair from day one.
What to Have Ready on Installation Day
To keep the installation moving without delays:
- Clear a path from the main entry to the air handler location and to the outdoor unit area
- Make sure pets are secured away from work areas
- Confirm someone over 18 is home for the full installation window
- Have your thermostat model or app login ready if the installer needs to pair the new system
- Plan to be without air conditioning for most of the day
Schedule Your AC Installation With Apple AC
A new AC installation is one of the biggest home improvement investments you will make. Getting it done right the first time matters more than getting it done fast. Apple AC has been installing and replacing AC systems across Central Florida since 1997. We carry York, Amana, and Daikin systems and match every homeowner to the right system based on their home’s actual needs, not whatever happens to be in stock.Our NATE-certified technicians serve Orange, Lake, Seminole, Osceola, and Sumter Counties, including Winter Garden, Clermont, Orlando, Kissimmee, Ocoee, Apopka, Lake Mary, and surrounding communities. Every installation comes with the option of a 10-year parts and labor warranty, and we offer financing options to make a new system manageable on any budget. Ready to get started? Get a free estimate, ask about our service agreements to protect your new investment, or call us at (407) 654-3777. We do more than just talk about service.